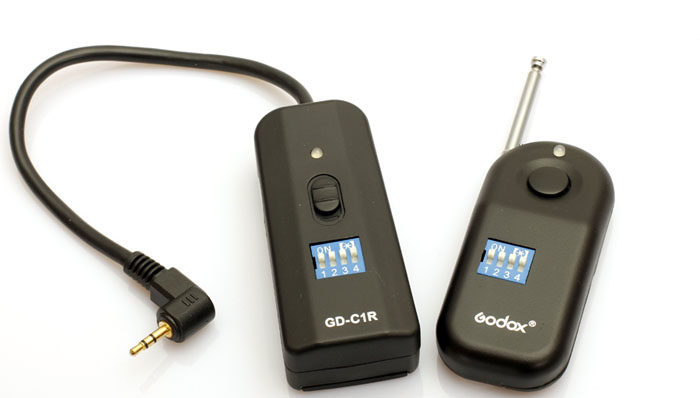
Shenniu GD-C1R, is a wireless remote control, the product can be suitable for a variety of
Camera tasks, remote wireless control. 16 kinds of FM options suitable for multiple photographers at the same time shooting environment, strong anti-interference ability, with bulb and continuous shutter function(The camera must be set accordingly)1. Main functions:
1. Remote wireless remote control, the effective remote control distance of shutter release is about 30 meters(Undisturbed open space);
2. With 16 channels, strong anti-interference;
3. With wireless bulb and continuous shooting function(The camera needs to set the corresponding function);
4. Micro power consumption design, longer use time.
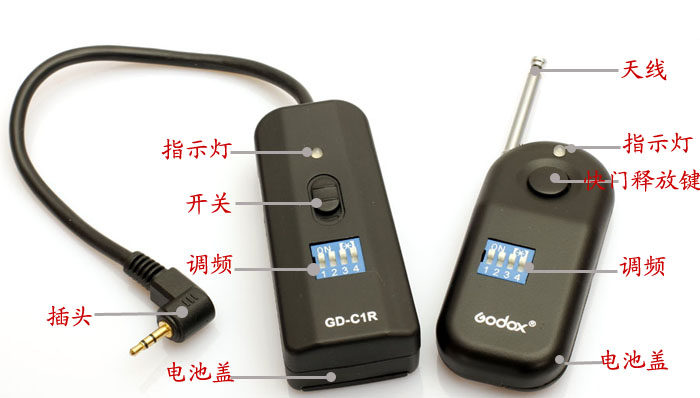
2. Install the battery:
1. Receiver: Slide open the battery cover on the back of the receiver, and install 2 AAA batteries.
2. Transmitter: Open the screw on the back cover of the transmitter and insert a 12V/23A battery(Factory equipped).
3. Channel setting:
Turn off the power of the receiver first, and adjust the position of the encoder switch on the transmitter and receiver to be the same, that is, the same channel(16 channels in total), And then turn on the power to work.
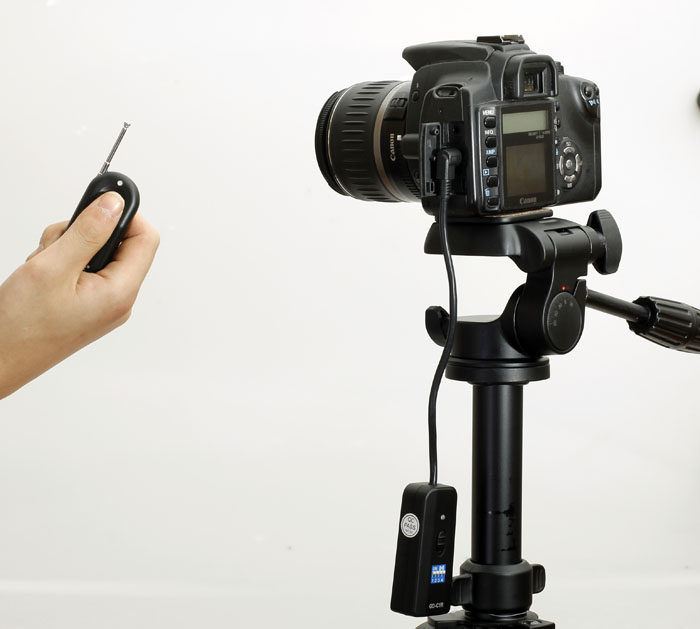
4. Remote control operation:
1. Turn off the camera''''''''''''''''''''''''''''''''''''''''''''''''''''''''''''''''''''''''''''''''''''''''''''''''''''''''''''''''''''''''''''''''''''''''''''''''''''''''''''''''''''''''''''''''''''''''''''''''''''''''''''''''''''''''''''''''''''''''''''''''''''''''''''''''''''''''''''''''''''''''''''''''''''''''''''''''''''''''''''''''''''''''''''''''''''''''''''''''''''''''''''''''''''''''''''''''''''''''''''''''''''''''''''''''''''''''''''''''''''''''''''''''''''''''''''''''''''''''''''''''''''''''''''''''''''''''''''''''''''''''''''''''''''''''''''''''''''''''''''''''''''''''''''''''''''''''''''''''''''''''''''''''''''''''''''''''''''''''''''''''''''''''''''''''''''''''''''''''''''''''''''''''''''''''''''''''''''''''''''''''''''''''''''''''''''''''''''''''''''''''''''''''''''''''''''''''''''''''''''''''''''''''''''''''''''''''''''''''''''''''''''''''''''''''''''''''''''''''''''''''''''''''''''''''''''''''''''''''''''''''''''''''''''''''''''''''''''''''''''''''''''''''''''''''''''''''''''''''''''''''''''''''''''''''''''''''s power first;
2. Connect the receiver plug to the camera, and turn on the power of the camera and receiver;
3. Press the shutter switch on the transmitter, the indicator light flashes the same as the indicator light on the receiver, and you can start work;
4. B shutter, first set the camera to B door, long press the transmitter and wait for the red light to turn on until it goes out(About 3 seconds)That is, release the button, and the receiver will automatically switch to the state of door B. You need to release door B and press the transmitter again.
5. For continuous shooting, first set the camera to the continuous shooting function, long press the transmitter and wait for the red light to turn on until it goes out(About 3 seconds)Just release the button, and the receiver will automatically switch to the continuous shooting state. You need to cancel the continuous shooting and press the transmitter again.
Three shooting modes are applicable:
A: Single shutter
Half-press the release button on the transmitter to activate the camera''''''''''''''''''''''''''''''''''''''''''''''''''''''''''''''''''''''''''''''''''''''''''''''''''''''''''''''''''''''''''''''''''''''''''''''''''''''''''''''''''''''''''''''''''''''''''''''''''''''''''''''''''''''''''''''''''''''''''''''''''''''''''''''''''''''''''''''''''''''''''''''''''''''''''''''''''''''''''''''''''''''''''''''''''''''''''''''''''''''''''''''''''''''''''''''''''''''''''''''''''''''''''''''''''''''''''''''''''''''''''''''''''''''''''''''''''''''''''''''''''''''''''''''''''''''''''''''''''''''''''''''''''''''''''''''''''''''''''''''''''''''''''''''''''''''''''''''''''''''''''''''''''''''''''''''''''''''''''''''''''''''''''''''''''''''''''''''''''''''''''''''''''''''''''''''''''''''''''''''''''''''''''''''''''''''''''''''''''''''''''''''''''''''''''''''''''''''''''''''''''''''''''''''''''''''''''''''''''''''''''''''''''''''''''''''''''''''''''''''''''''''''''''''''''''''''''''''''''''''''''''''''''''''''''''''''''''''''''''''''''''''''''''''''''''''''''''''''''''''''''''''''''''''''''''''''s auto focus system and metering system, and the indicator light on the transmitter turns green. When you press the release button fully to take a picture, the indicator light turns green.
B: Continuous shooting
The operation steps are the same as the single shutter, except that you keep pressing the release button during continuous shooting.
C: B door mode. Keep pressing the release button of the transmitter. When it lasts for more than 3 seconds, the red indicator light will go out. You can release the release button at this time. Press the release button again to end the bulb shooting.
| | launcher | receiver |
| power supply | 12V/23A | 2×1.5V/AAA batteries |
| Battery Life | Standby for one year or trigger 20,000 times continuously | Standby > 800 hours |
| Number of channels | 16 | 16 |
| Remote control distance | 30 meters(Undisturbed open space) | ----- |
| Work instructions | Two-color LED indication | Two-color LED indication |
| Transmit frequency | 433MHz | ----- |
| Bulb setting | Long press the red light for 3 seconds | -----
|
Model: GD-C1R
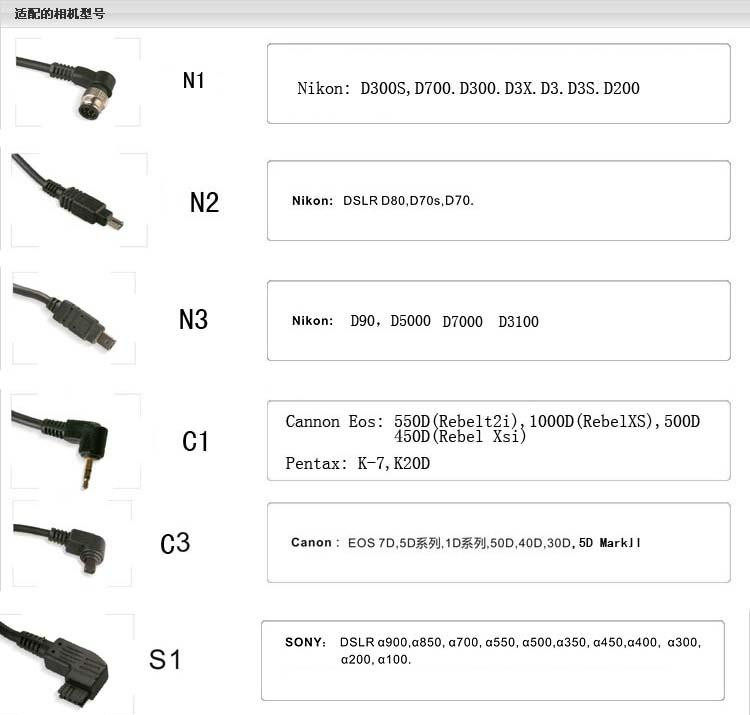
Support camera models:
Canon 500D 550D 600D 1000D etc
Pentax: K-7, K-20D