


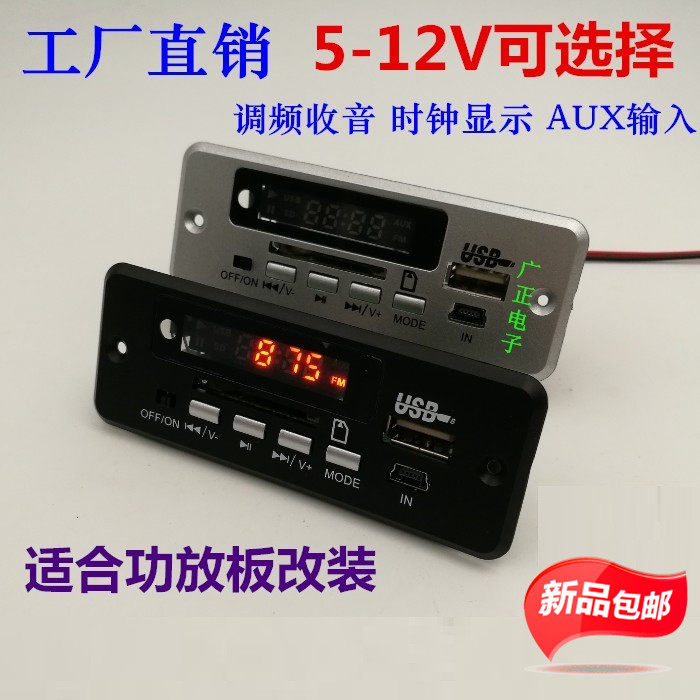
Friendly reminder: There is 1 price for this baby to choose from, please pay attention to the description below and choose the color classification when shooting:(Available in silver panel and black panel)
Default delivery: 1 host(Nothing else)
Baby features:(This machine does not come with a power amplifier, dual audio output, suitable for car and power amplifier installation):
1. Support MP3 songs of 32-320kbps;
2. Can read MP3 songs in U disk, SD, MMC card(If you use the TF card, you need to insert it on the card sleeve.Available in this shop);
3. With a digital LED display, it can display the current working status;
4. FM FM radio function, you can listen to local FM radio stations after connecting the antenna;
5. The external sound input function, you can connect to CD, mobile phone, computer and other external sounds to switch in;
6. Support power-off memory: after power-off, re-power on and start playing from the song in the power-off state;
7. Two-channel audio output, suitable for installation on cars and power amplifiers;
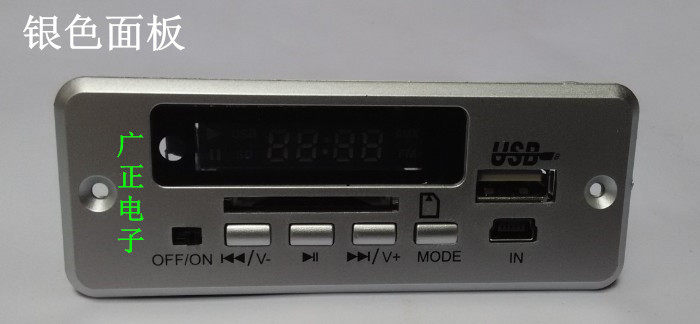
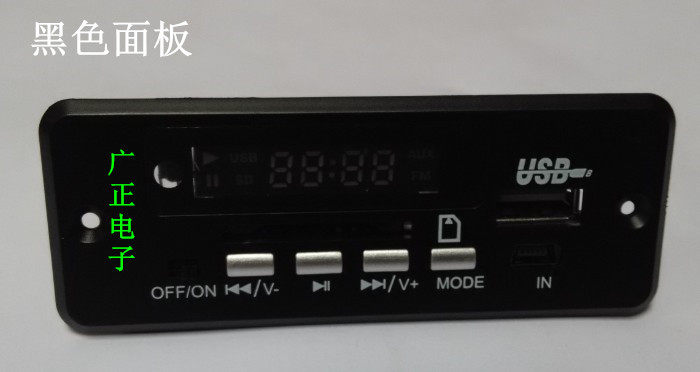
Products Show(In-kind shooting, there are silver and black panels, please choose when shooting! PCBs of different batches may be slightly different, please be careful when shooting!):

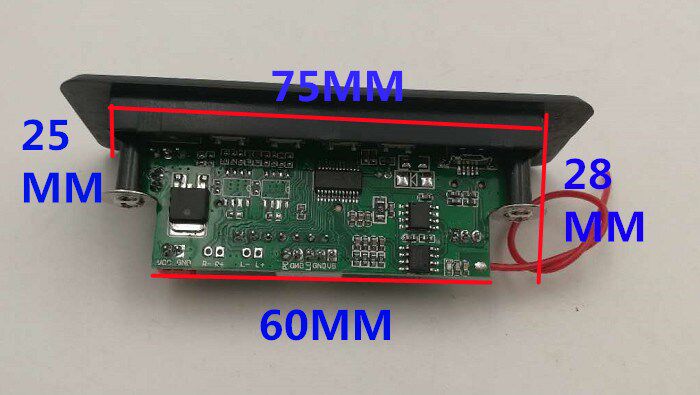
Product specifications:
Installation hole distance: width 80 mm
Installation opening: width 76 * height 28mm
Overall dimensions: width 92 * height 35 * depth 40mm
Panel function description:
1. “PREV/VOL-”: long press to decrease the volume; short press in the USB/SD state to be the previous track; short press the previous station in the FM state;
2. “PLAY/PAUSE”: In the USB/SD state, short press to play/pause; in the FM state, long press to search and store all channels;
3. “NEXT/VOL+”: Long press to increase the volume; short press the previous track in the USB/SD state; short press a radio station in the FM state;
4. “MODE”: Mode switching, each time you press to switch the working mode;
5. IN: Input, one-wire interface, 5V voltage and external sound can be input from this interface.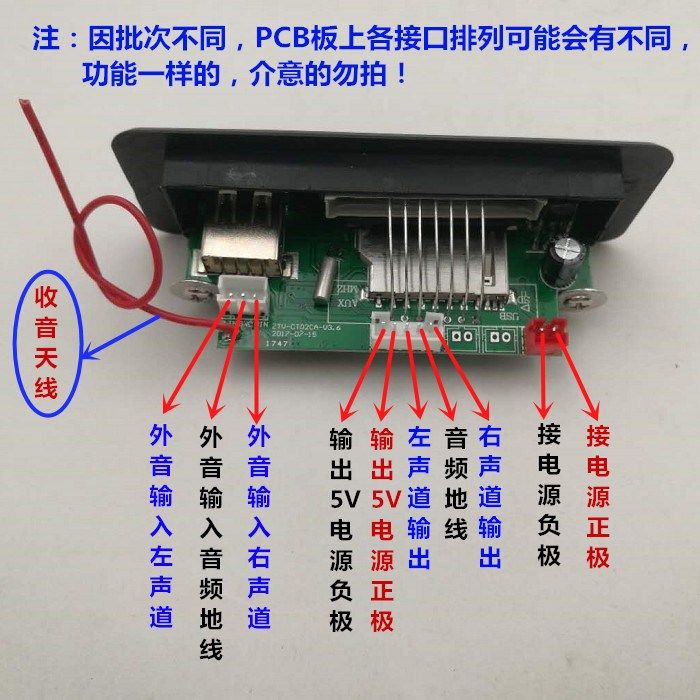
Wiring instructions:
1. 12V connection: 2P socket, +12V is connected to the positive pole of the 7V-12V DC power supply, and GND is connected to the negative pole of the power supply;
5V(3.7-5V)Connection method: connect BAT+ to 5V+ without header, connect BAT- to GND(Ground), Respectively connect to the positive/negative 5V power supply(GND)
Special note: The current is 600MA-1A, if the current is not enough, there will be phenomena such as skipping or remote control failure.(If you have this problem, please check your power supply); See the picture above, pay special attention to the product cannot be connected to two sets of power supplies at the same time(5V/12V choose one)The voltage cannot be higher than the required voltage value of the product, otherwise the main chip and related components will be damaged!
Tips: If it is modified to a car, you only need to connect the 12V voltage to the 12V voltage input terminal of the decoder board at the position where the car is installed with the radio.
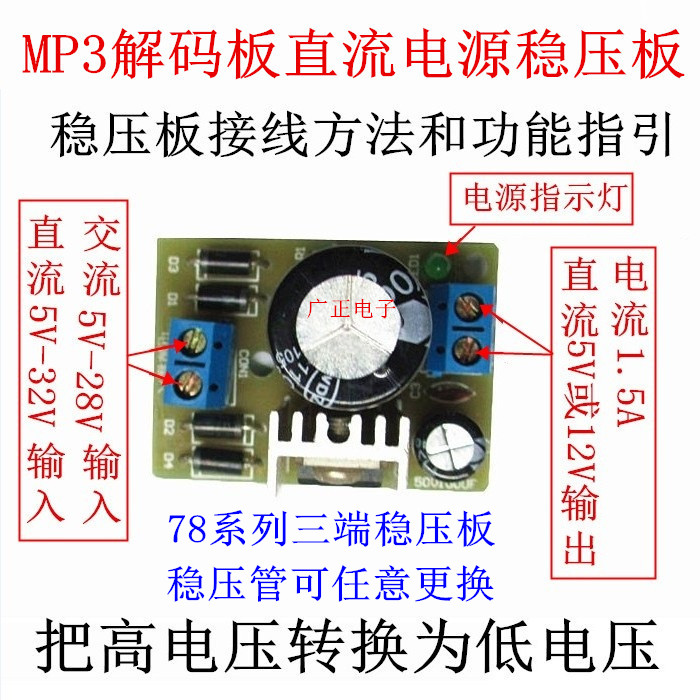
1,If you connect directly to the battery, please add a 7812 regulator board, the current is stable, there is no current sound, and the effect is good. If you need it, please take the link below:
https://item.taobao.com/item.htm?id=522675996382
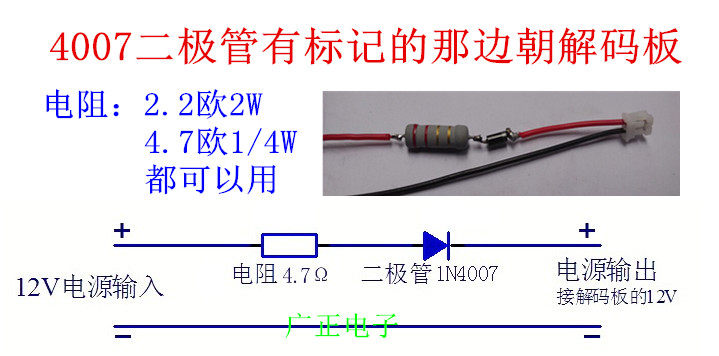
2,If you connect the battery directly to the battery, please connect a 4007 diode and a 2.2 ohm 2W resistor in series to limit the current, but the effect is not good.See the picture below for details, you need to send resistors and diodes(Components), Please contact customer service for instructions or remarks!
2. 3P seat: R-IN connects to the right sound channel of the external sound, GND connects to the external sound ground, and L-IN connects to the left sound channel of the external sound;
3. 5P socket: R-O is connected to the right channel output, G is connected to the audio ground, and L-O is connected to the left channel output; G is the power ground, and V is the 5V output (this 5V output can not be connected if it is not available).
(Note: 5V output when connected to 12V)
4. The ANT white pad on the side of the 3P seat is where the radio antenna is welded. The radio antenna can be a copper wire or whip antenna of more than 1 meter.
Radio operation instructions:
1. Weld the radio antenna first;
2. Press the MODE button to turn to the radio mode;
3. Press the PLAY/PAUSE button to search and store all channels in all channels;
4. Press the previous or next button to go to the previous or next station;
Note: The radio effect varies with different geographic environments. The radio may not be received in places with weak or no signal, so please be careful!
It is strongly recommended to purchase the following standard accessories of our company to avoid unnecessary damage:
12V1A power supply:
http://item.taobao.com/item.htm?spm=686.1000925.0.0.RJJ4pq&id=43385719938
card cover:
http://item.taobao.com/item.htm?spm=686.1000925.0.0.VUymjs&id=37893099104
USB Bluetooth stick:
http://item.taobao.com/item.htm?spm=686.1000925.0.0.VUymjs&id=43123490222
Alligator clip:
http://item.taobao.com/item.htm?spm=686.1000925.0.0.ucW9RM&id=42931644630
Radio antenna:
http://item.taobao.com/item.htm?spm=686.1000925.0.0.pfZZKg&id=43447800863